
Blackboard assignment can be used for your students to submit their work to in an electronic format.
Blackboard assignment are very similar to Turnitin assignments but they are not the same thing. Both can generate similarity reports, both can use a rubric when marking, and both submit a score to grade center.
With blackboard assignments as well as being able to upload multiple files in any format, students can also type their submission straight into blackboard with the blackboard text editor. This give students the option to use the mashups tools and include a video from Panopto.
Blackboard assignments also work with blackboard groups. Which means you can create a group assignment and the group can work on it collaboratively within blackboard, and submit a single piece of work for assessment.
One thing to be aware of is that students can start working on their assignments and save it as draft. You can’t mark the assignment until it has been fully submitted. Some time students don’t realize that they have to click the submit button before it can be marked.
For further information click to expand the links below:
Help guide from blackboard https://en-us.help.blackboard.com/Learn/Instructor/Assignments/010_Create_and_Edit_Assignments
Video tutorial for blackboard assignments with SafeAssign https://www.youtube.com/watch?v=QId2Xza_95k
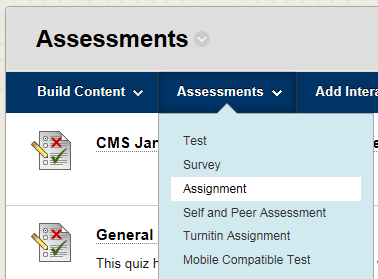
To create a blackboard assignment first open the blackboard module where you wish to create the assignment, then click on the assessments tab in the left menu.
You will then see the assessments page. Click on the assessments tab in the top menu and choose Assignment.
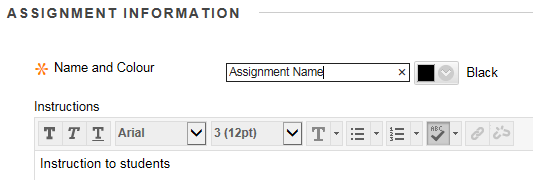
The Create assignment page will open. In the assignment Information section, enter a name for the assignment and instruction for your students.
Use the Assignment Files section to attach any files that will be need to complete the assignment.

You can include instruction, a template for student submission, and any other resources that students will need to complete the assignment.
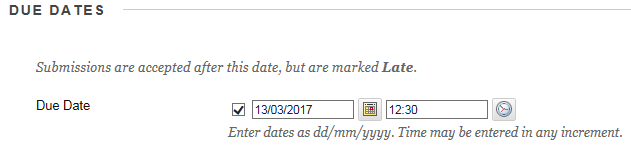
The Due dates section is used to set the due date for the assignment. If you want to set a due date enter a date and time when you enter a date the tick box will automatically become ticked. If student submit after the due date the paper will be marked as late.
It is recommended that you set due dates to be within office hours, so if students have problems submitting, the IT service desk will be maned to help them.
You can click on the calendar or clock icons to open a popup window and choose the date/time.
The grading section is where you set the score for the assignment, you can also add a rubric there are also three optional subsections.

Enter a score for the assignment. This is a point value the grade center column will take.
You also have to option to add a rubric. A rubric is a scoring system for marking your paper. See the help files on Blackboard rubrics for more information about setting up a rubric and marking with a rubric.
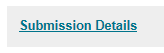
Submission Detail is the first optional subsection of grading section. Click on the submission details link to open the subsection.
In submission details set the assignment type
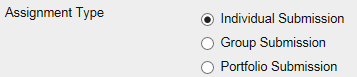
- With Individual Submission every student will make a submission
- With Group Submission there will be one submission per included group
- We don’t recommend using the portfolio Submission type. If you would like to use portfolios for assessment of student work please contact the TEL team about the alternative options.
If you want to create an assignment for a groups, before you create the assignment you need to know
- A course group must exist before you create group assignments for it.
- Students who are enrolled in more than one group that receives the same assignment will be able to submit more than one attempt for this assignment. You may need to provide these students with an overall grade for the assignment.
- Students who aren’t enrolled at the time that a group assignment has been submitted don’t have access to that submission. These students only see that the submission occurred.
- Students who you remove from a group can’t see the group assignments. They can access their submissions from My Grades.
- If you edit the assignment between creation and the due date, the entire group may lose any work already in progress.
- If you delete a group from the assignment after students have started an attempt but before submission, they’ll lose access to the assignment and lose their work.
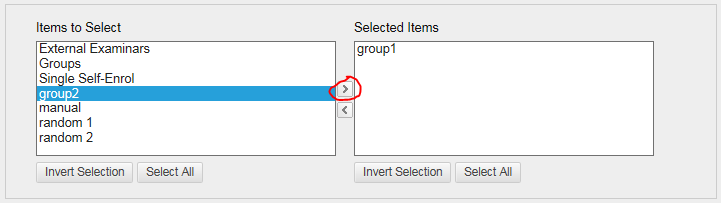
When you selected groups a new window will appear to allow you to choose which groups you want to do this assessment. To add groups click on the groups in the left window to select them, then click in the right pointing arrow to move them to the selected box.
Choose how many attempts the students can make.
![]()
If Multiple Attempts is chosen a box appears for you to enter the maximum number of attempts.
If Multiple Attempts or Unlimited Attempts is chosen you get a choice of how you want to grade the multiple attempts. It’s recommended that you grade the last attempt.

At the University of Derby you would normaly set this to Unlimited Attempts and sccore the Last Graded Attempt, but you are free to choose other setting if this is not appropiate. If you didn’t select Single attempt it’s recommended that you don’t start marking until after the due date.
The Plagiarism Tools allows you to check your student’s submission against a data base to check for Plagiarism.
![]()
Check the tick box to generate originality reports using SafeAssign.
SafeAssign originality reports works similarly to the TurnItIn similarity reports but it doesn’t quite have a big a database to draw from. However unlike Turnitin if the SafeAssign server are down during the submission period it will not prevent students from submitting their work. It will just delay the generation of reports.
If you select to use SafeAssign you get two more options.
![]()
If you select “Allow students to view SafeAssign originality report for their attempts” students will be able to check if anything plagiarized and if they are allowed additional attempts resubmit their work.
If you select “Exclude submissions from the Institutional and Global References Databases” this mean that future submissions referencing this paper won’t highlight similarities. This option should be used if this is a draft paper and you will want to do another originality report on the same paper in the future.
SafeAssign only accepts files in .doc, .docx, .docm, .ppt, .pptx, .odt, .txt, .rtf, .pdf and .html file formats. Files in other formats won’t receive an originality report.
Note: this list of files is not the same as the file accepted for Inline Grading. If you want to do inline grading and use SafeAssign, tell your student to submit file in .doc, .docx, or PDF file formats. The PDF also need to be saved in a format where the text is selectable.
For the University of Derby, from September 2019, it will be the policy that by default all marking will anonymised. There will be some exception where if strict criteria are met and approved the paper need not be marked anonymously.
Even if you know which students are submitting which work, you will have to Enable Anonymous Marking to enable anonymity during moderation.
You Enable Anonymous Marking by clicking on the Enable Anonymous Marking check box in the grading options and setting a date when Anonymous Marking will be turned off. This should be after internal moderation have taken place.
Students are informed that the paper will be marked anonymously, and when viewing results are told if the paper was marks anonymously. If the grade is changed after the anonymity is removed the student are informed. You should only change grade after the students name is reviled by comity and all changes should be logged.
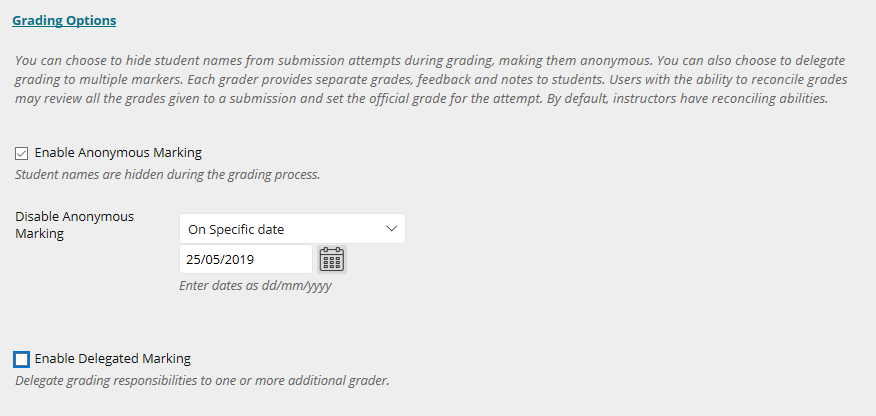
In the grading options section you also have the option to turn on delegated marking. This will enable you to distribute the marking workload.
To open the displaying of grades section click on the link
This section set how the students will see the results and what type of result it is.
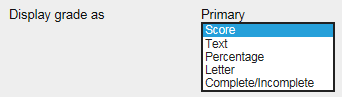
If the result was a grade you would use the letter option
If you had a pass/fail assignment you would use the text option
Normally score or percentage is used.
If you uncheck the “Include in Grade Centre grading calculations” option then there will still be a column in grade center but you won’t be able to includes it in calculations.
![]()
If you have “Show to students in My Grades” checked, students will be able to see their marks as soon as you mark the paper.
![]()
If you don’t want the students to see their results until you have finish marking all the papers uncheck this. Then when you are ready for students to see the results you can unhide the column in full grade center.
This section sets the time when an assignment is available to students. If you would like to use criteria other than time for setting availability see the adaptive release help guides.
To make an assessment available to students make sure you have the “Make the Assignment Available” ticked.
If it is not ticked students won’t be able to see it even if it is within the time window set in limit availability. The exception to this is if the paper has been marked and the grade center column is not hidden, students have access to view their submitted assignments through the provisional grades and feedback tab.
Limit Availability sets the time period when the assignment is available.

If you want to limit the time when students can view the assessment enter a date and time into the boxes. You can click on the calendar or clock icons to open a popup window and choose the date/time. When you enter date or time the tick box will automatically become ticked.
If you enter a date to display after and a date to display until. The assessment will only be available between those dates.
If you untick one of the dates you disable the limit and the displayed date in the box will be lost when you submit the changes.
Note: make sure the assignment will be available on the due date.
Note: The late submission policy dictates that the students must be able to submit up to 7 days after the due date. so make sure the Display Until date is at least 7 days after the due date.
If you tick Track Number of Views it allows statistics to be generated on usage
![]()
Finely click the submit button.
When you click the submit button a new column will appear in full grade center to store the students results.
Blackboard Inline Grading for Assignments tutorial
https://www.youtube.com/watch?v=CbafANRJ7Zw
To start grading first you need to go to the module in blackboard and then click on the Grade Center tab in the left menu of the module. You then need to click on “Needs Marking” to open the list of submitted assignments for that module. Click on the assignment you wish to mark.

Inline grading is where you can add feedback comment directly to point within students’ submissions.

Inline grading accepts most text and image files formats and gives you the ability to annotate them. None text files such as audio and video can be displayed but can’t be annotated.
The full list of accepted file types that can be anotated can be found here https://help.blackboard.com/Learn/Instructor/Assignments/Grade_Assignments/Bb_Annotate
Note: this list of files is not the same as the file accepted for SafeAssign. If you want to do Inline Grading and use SafeAssign, tell your student to submit file in .doc, .docx, or PDF file formats. The PDF also need to be saved in a format where the text is selectable.
Above the main panel there is the inline grading Menu. The contents of this may change depending on your screen size

- A. Sidebar: View Thumbnail, Outline, or Annotation views of the submission.B. Pages: Use the arrows to jump to different pages in the submission.C. Pan: Move the submission on the page.D. Zoom and Fit: Zoom in and out of the submission or adjust the view to fit the page, fit the width, or select the best fit.
Annotations
E. Annotation tools: Select each tool to view the tool properties.
- Drawing, Brush, and Eraser: Draw freehand on the submission with various colors, thickness, and opacity. Select the eraser to remove annotations. You can erase parts of a freehand drawing with the eraser or select the Delete icon to delete the whole drawing.
- Image or Stamp: Choose a preloaded stamp or create your own customized stamp or image to add to the submission.
- Text: Add text directly on the submission. You can move, edit, and change the text and select the font, size, alignment, and color of the text.
- Shapes: Choose Line, Arrow, Rectangle, Ellipse, Polygon, and Polyline. Each shape has its own settings to change the color, width, opacity, and more.
F. Comment: Provide feedback in comments. Your comments appear in a panel next to the submission.
Students can access the annotated files but won’t be able to add annotations in their submissions.
G. Print or Download: Print or download the submission with the annotations.
A known issue with some browsers’ built-in PDF viewer may not display all your annotations. Please view annotated PDFs in a native PDF viewer such as Adobe Acrobat.
H. Search: Search the submission for specific text.
I. Content Library: This is not yet available to university of derby staff.
For more help and a video on using Blackboard annotate please use the blackboad help page https://help.blackboard.com/Learn/Instructor/Assignments/Grade_Assignments/Bb_Annotate
It is recommended that for marking you hide the blackboard left menu with hide button that become visible when you mouse over the left menu
The grading panel can be found on the right, what’s included in the grading panel changes depending on the setting of the assignment.
The top section is the assignment details.
![]()
If you click the drop down arrow a panel with expand with the assignment details.
The right pointing arrow will hide the grading panel.
The four arrow pointing at the corners expands the grading area and hides all unnecessary panels.
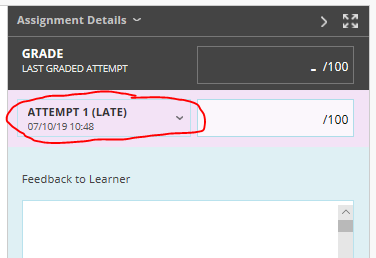
Below that you have a Grade section.
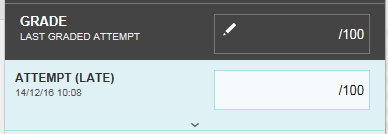
The top grey section show the mark for a previous attempt if there is one. The white box in the blue section is where you enter the grade for this attempt. Here we see the attempt is marked as “LATE”. If more than one attempt has been submitted you would see the submission number too.
If you used SafeAssign with this assessment then in this section you will also get the SelfAssign information.
![]()
Looking at this you would initially think this is a paper that has been plagiarized. If you click on the SafeAssign link you will expand the SafeAssign section to see more info.
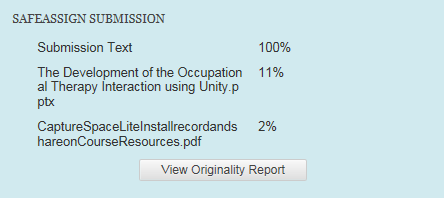
When you look at the full panel you see there are three submission. A text submission, a PowerPoint file, and a PDF. It still looks very suspicious the Text submission has a 100% similarity to another document. Click on “View Originality Report” to open the full report.
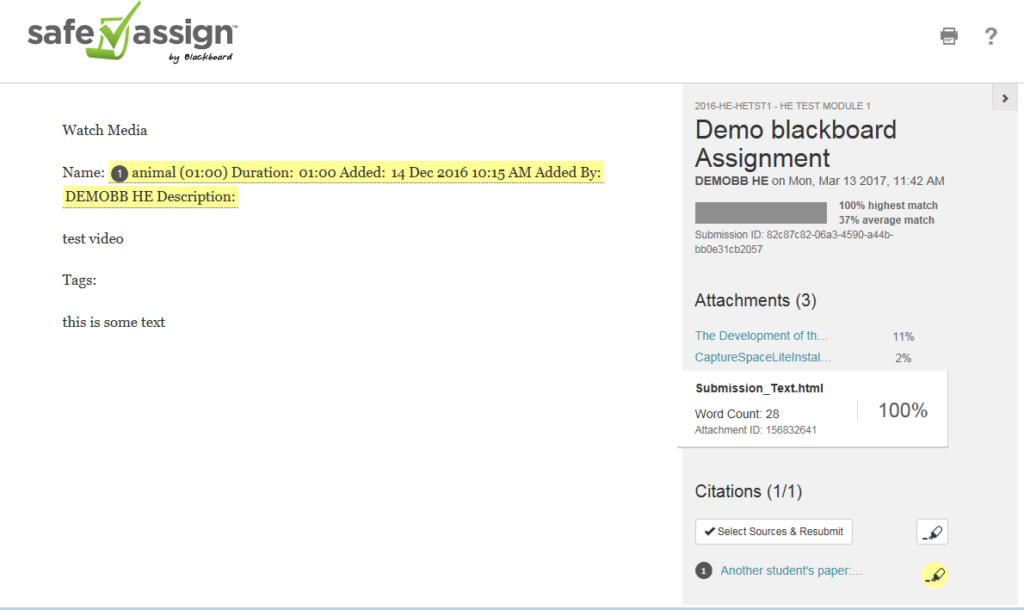
Now you can see the full Originality Report. With a break down in the right panel.
In the middle of the panel you can see the three submission with the “Submission_ Text” selected, you see that the Submission Text is just 28 words.
In the bottom section of the pannle you can see what they match with. In this case it matches another student’s paper, next to that you see a pen color (Yellow). In the main panel you see text highlighted in the same color. The highlighted text is what match this source.
When you look closely at the words you see that they are the words that are automatically generated with the video submission. So this is not an issue.
You can click on the other two documents in the right panel to open their originality reports.
Close the browser tab to return to marking page.
Click the dropdown arrow at the bottom of this section and the feedback panel expands.
If you have attached a rubric to this assignment you will see the rubric section.
![]()
See Using Blackboard Rubrics to Grade for full instruction on grading with rubric.
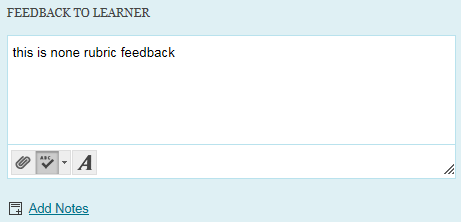
Here you can add overall feedback not connected to a rubric or inline marking.
If you click on the add notes button you can add a private note that can be seen by other tutors but not the student.
Click Submit to submit the score, and all the feedback.
Below the blue section there is a grey section here you will find links to open the submissions.

Click on a submission to start inline marking.
If the submission is in a format that can’t be marked inline you will have to download the file and open it in an appropriate application. To download the file click on the download button.
If the assignment is a group assignment you will see the Group member here.
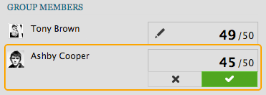
In this section you can override the group score and give different members of the group different scores.
Select the Override/revert icon to change the grade for a group member. Type a new grade and click the Save icon to save it. This grade becomes an override grade.
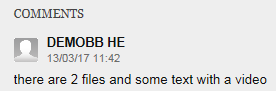
When a student submits an attempt they have the option to leave a comment. IF this was done you will also see the comment in the grey section.
When you have finished grading the paper click on the arrows to grade the next item.

When you mark a blackboard assignment, it tells you in the marking window if the assignment was submitted late and give you the precise time of submission.
If the submission is less than 7 days late, you will market in normally and include in the feedback what score they would have received if it was not late and cap the score for the paper at 40% for undergraduate and 50% for postgraduate students if they received a passing grade.
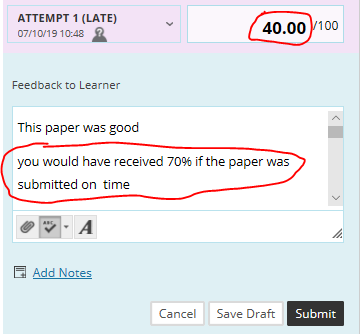
If the submission of more than 7 days late you don’t need to mark it and the score should be left blank.
You can use Panopto to accept video submissions. Students can either create their video in Panopto or record with a camera on phone or other camera device and upload their video into Panopto.
Guidance on creating the assignment with Panopto video submission.
The differences between Blackboard assignments and Turnitin assignments
Recording of training sessions
DELTA Staff Development Training room / Blackboard assignments 22/01/21