
A blog is a personal online journal that is frequently updated and intended to share with others. Most blogs also have a commenting feature, so that people can respond to one another’s thoughts.
In Blackboard (Course Resources), tutors create and manage blogs, and only enrolled users can view and create entries and comments in them. Similar to journals, you can use blogs for a graded assignment or gather opinions and information without assigning a grade.
For further information click to expand the links below:
Blogs consist of two elements:
- Blog entries: Text, images, links, multimedia, social media, and attachments added by course members.
- Comments: Remarks or responses to blog entries made by other module members, including the instructor.
You can allow students to participate in blogs in three ways:
- Module blogs: You can create a module blog and choose the topic. All module members can add blog entries and comment on blog entries.
- Individual blogs: Students can add entries only to their own blogs. All other module members can view and add comments to it.
- Group blogs: If you enable the blogs tool for a group of users, they can perform these tasks:
- Group members can add blog entries and make comments on blog entries, building upon one another.
- All course members can view group blogs, but non-group members can only add comments.
You have full control over all blogs in your module. You can edit and delete entries in any of the blog types. You can also delete user comments.
You must create blog topics before students can add their entries. A blog topic helps keep entries organized around a central theme. You can create more than one blog topic for students to add entries about different subjects.
- Go to Control Panel > Module Tools > Blogs and select Create Blog.
- Type a name and optional instructions. Make the blog available to students.
- Select the Display After and Display Until check boxes to enable the date and time selections. Display restrictions don’t affect the blog availability, only when it appears.
- In the Blog Participation section, decide if the blog is for individuals or the course. You may also allow some anonymous posting.
- In the Blog Settings section, select Monthly or Weekly Index Entries. Optionally, select check boxes to allow users to edit and delete entries, or delete comments.
- In the Grade Settings section, select No grading or the Grade option and type the number of Points possible. Points possible will apply to one or more entries made by a user to the blog topic. After you enable grading, a column is created automatically in the Grade Center. The blog is permanently gradable, and you can’t change the setting to No grading.
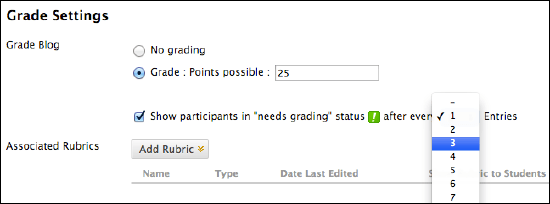
- If you want, select the check box for Show participants in needs grading status and select the number of entries required. If you apply this setting, the Needs Grading icon will show in the Grade Center. The entries will appear in the queue on the Needs Grading page after student activity meets this threshold.
- Add a rubric if you want.
- Select Submit.
The blog topics appear in alphabetical order on the Blogs page. Select a column title to sort the contents. To learn more, see the Blog Topic Page.
You can also add links to blogs in course areas, such as content areas and folders.
Access the blog topic page in these ways:
- In the Blogs tool, open a blog and select a user from the All module Members menu.
- On the Needs Grading page, select Grade All Users in a blog’s menu.
- In the Grade Center, locate the column for the blog you want to grade. Hover over a cell with the Needs Grading icon to access the blog’s menu. Select Grade User Activity.
The blog topic page is divided into two main sections. In the content frame, you can view the blog entries. In the sidebar, you can view information about the blog topic or entry. You can expand the Index and grade the blog entry if the blog is gradable. You can select an individual user’s name to view the entries alone in the content frame.
If you don’t see the grading feature in the sidebar, your school hasn’t turned this feature on.
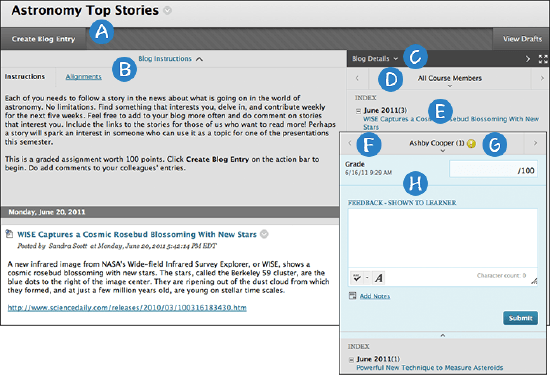
A. Select Create Blog Entry to add your thoughts.
B. Blog Instructions are expanded by default, but you can minimize them. Select Alignments to add alignments.
C. In the sidebar, you can expand the Blog Details section to display information about the current selection, including the author and number of entries and comments. Select the right-pointing arrow to collapse the sidebar for more viewing room for entries. Select the four arrows icon to view the blog entries in full screen.
D. For All module Members, select the down-pointing arrow to view a list and select a member. The selected member’s entries appear in the content frame. Optionally, select Show members without entries.
E. The Index section displays the titles of the entries created during the selected time period. Select the minus sign to collapse the title list.
F. Use the left- and right-pointing arrows to navigate to the previous or next student.
G. For graded blogs, icons designate the status of a user’s activity. The Needs Grading icon indicates that a user has met the minimum activity for grading you set for the blog. The In Progress icon appears when a user has some activity but hasn’t yet met the minimum number required to trigger needs grading status.
H. In the grading sidebar, provide a grade and feedback for a student.
You and your students create blog entries and other module members can make comments on the entries. As the instructor, you can use blog entries to provide structure for discussions on class topics and other issues.
On the Blogs listing page, after each blog title, students can see if the blog belongs to a group, the course, or to individual students. All members can read group blogs, but to make an entry, a user must be a group member.
- On the Blogs page, select a blog title.
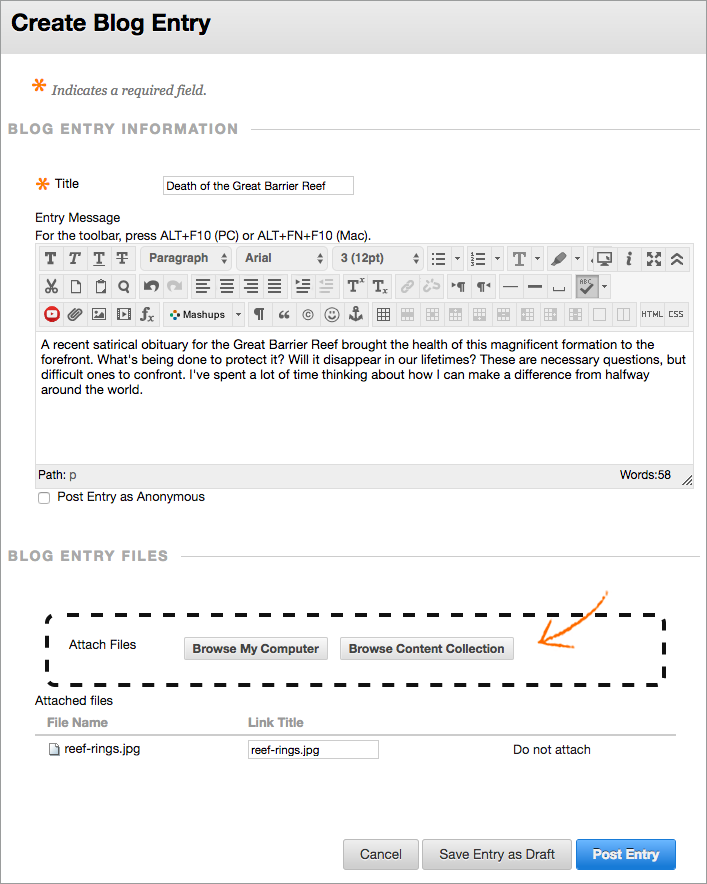
- On the blog’s topic page, select Create Blog Entry.
- Type a title and entry.
- If enabled and appropriate, select the check box for Post Entry as Anonymous.
- Select Browse My Computer to upload a file from your computer. You can also attach a file from the repository: Course Files or the Content Collection.-OR-Drag files from your computer to the “hot spot” in the Attach Files area. If your browser allows, you can also drag a folder of files. The files will upload individually. If the browser doesn’t allow you to submit your work after you upload a folder, select Do not attach in the folder’s row to remove it. You can drag the files individually and submit again.
You can use the file name or provide another name for the file. - Select Post Entry to submit the blog entry or select Save Entry as Draft to add the entry later.