
You can ask another member of staff to act as a live captioner – where captions will appear under the slides during the session. The recording of the session will also capture these captions for those who are not able to attend live.
Tips:
- It is good to have someone available with a good level of typing skills in order to make this quicker and more accurate.
To make someone a captioner click on the three dots next to their name in the participant panel, then click on the Make Captioner button
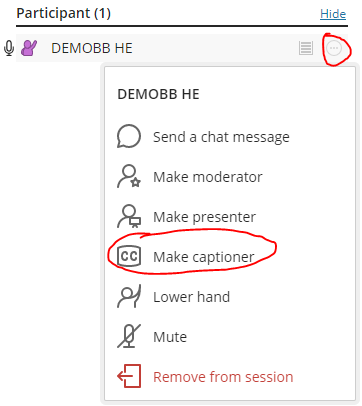
The Captioner will then have to accept the role of captioner by clicking the Let’s Get Started button

attendees then have the option to view the captions

Unfortunately, Collaborate does not provide in built automatic captioning. There are however several options to help create captions or summarise the key points made in Collaborate sessions. If students within the teaching session require captions and it is expected that there will be a significant contribution from other students, it is recommended that Microsoft Teams should be used and recorded using Panopto. The auto-captioning option within Teams will capture all participants rather than just your contribution.
Sharing your PowerPoint in Office365
Use automatic captions generated through Microsoft Office 365 PowerPoint (online and latest version of app on desktop) then share this screen within Collaborate.
Tips:
- Use subtitles below slides so it does not obscure any content on the slides themselves.
- As the words displayed will only caption you, repeat questions or key points being made by others so these are also captioned.
- Auto-captioning is not 100% accurate so make sure students are aware of this and to ignore any translations that don’t make sense. This is sometimes more problematic for acronyms and subject specialist terminology.
Adding them to the recording – this is only needed if the above options have not been used
Download the recording and then upload it into Panopto. The recording will then have auto-captions added. You can also edit these if they are not accurate.
To be able to download the recording you need to change the session settings to enable downloads.
- Download the recording
- You will now need to upload this into Panopto
- Watch back the recording to check the accuracy of the captioning and correct obvious errors.
- Auto-captioning is not 100% accurate so make sure students are aware of this and to ignore any translations that don’t make sense. This is sometimes more problematic for acronyms and subject specialist terminology.
chrome live caption
Students can download an experimental plugin for chrome that will automatically add subtitles for all the webpages they view in chrome. As this is currently experimental we can’t add a link but if the student do a google search for “chrome live caption” they should be able to find some advice.
Using Blackboard Collaborate Ultra to deliver online sessions with your students can help to bring together students at a distance whilst still enabling them to receive teaching materials and interact with each other. However, there are a few things that some students might find particularly challenging about accessing this type of learning opportunity.
For example:
- Following the multiple channels of communication can be difficult especially if some of them are inaccessible to the student (e.g. audio for hearing impaired students).
- Activities requiring immediate interaction can be more challenging for those with dexterity and spelling issues.
You may also be unaware of whether any students has a specific need because they might not have disclosed this to you before the session.
In order to help remove these barriers for students, it is important to think about accessibility when you are designing your session. Keeping the design of the session simple, providing easy ways for students to interact, as well as a balance between providing interest and ensuring content is accessible is a good starting point. You might also find that the adjustments you make to target the needs of specific students also benefit all students. However, take a look at the guidance provided below for more specific information on using Blackboard Collaborate Ultra inclusively. You might also find the Accessibility Guide for Participants useful for you and your students.
The resources have been divided into sections that look at what to do at different stages of the planning process and by need.
General Advice
Before the session
- Find out the needs of the students before running the session.
- Let them know the limitations of the software.
- Show them how to optimise the layout for their needs (Accessibility Guide for Participants).
- Get them to test any third party tools they use to see if they work with Blackboard Collaborate Ultra, e.g. colour overlays.
- Review your session plan and based on the needs of the students arrange any adjustments that are required.
- Consider getting someone to type closed captions into Blackboard Collaborate Ultra – this could be a participant in the session, another tutor or someone hired for this purpose. Instructions on this can be found at Live closed captioning.
During the Session
- Check regularly that no one is having problems, as you can’t assume students will make you aware if they are.
- Stress where in the sessions contributions are optional, so that students do not feel pressured to participate when they do not need to.
- When getting participants to type questions into the text chat area, get them to prefix them with Q to help you and others find them more easily.
- Get everyone involved in contributing to accessibility during the session. For instance, explaining visual elements on the screen, speaking clearly and at a reasonable pace.
After the Session
- Get feedback after the event and encourage students to be open with any difficulties they faced.
- Provide post event resources including links to recordings, transcripts and any files that were used during the session e.g. PowerPoint slides.
Adding captions
Unfortunately, Collaborate does not feature automatic captioning. However, there are still several options to help create captions or summarise the key points made in collaborate sessions. If students within the teaching session require captions and it is expected that there will be a significant contribution from other students, it is recommended that Microsoft Teams should be used and recorded using Panopto. The auto-captioning option within Teams will capture all participants rather than just your contribution.
Sharing your PowerPoint in Office365
Use automatic captions generated through Microsoft Office 365 PowerPoint (online and latest version of app on desktop) then share this screen within Collaborate.
Tips:
- Use subtitles below slides so it does not obscure any content on the slides themselves.
- As the words displayed will only caption you, repeat questions or key points being made by others so these are also captioned.
- Auto-captioning is not 100% accurate so make sure students are aware of this and to ignore any translations that don’t make sense. This is sometimes more problematic for acronyms and subject specialist terminology.
Using a live captioner
Ask another member of staff to act as a live captioner – where captions will appear over the slides during the session. The recording of the session will also capture these for those who are not able to attend live.
Tips:
- It is good to have someone available with a good level of typing skills in order to make this quicker and more accurate.
Adding them to the recording – this is only needed if the above options have not been used
Download the recording and then upload it into Panopto. The recording will then have auto-captions added. You can also edit these if they are not accurate.
To be able to download the recording you need to change the session settings to enable downloads.
- Download the recording
- You will now need to upload this into Panopto
- Watch back the recording to check the accuracy of the captioning and correct obvious errors.
- Auto-captioning is not 100% accurate so make sure students are aware of this and to ignore any translations that don’t make sense. This is sometimes more problematic for acronyms and subject specialist terminology.
Specific Advice by need
Here are some additional things to consider when planning a Blackboard Collaborate Ultra session. It looks at the challenges faced by these students and some of the possible adjustments.
Blind or Visually Impaired
Challenges
- Does the student listen to the presenter or to the screen reader? Which is most important? There can sometimes be a conflict between the two which can be disorientating and create confusion.
- How can the students access the visual information presented during the session?
- Some functionality may not accessible, even using assistive technology.
- How can the student keep up with the multiple threads of communication (text, video and sound) by sound alone?
Suggestions
- Provide students with an outline and resources for the session beforehand so students know which to focus on at a particular point.
- Check whether students are happy for others to know about their needs and how they prefer this to be explained to their fellow students.
- If possible, test any features you intend to use with the student in advance of the session.
- During the session, let the student know at what point they should focus on the presentation, discussion or information read out by the screen reader. They may need to silence the screenreader at particular points.
- Try and avoid relying too heavily on the text chat, repeat any points raised here verbally so students understand what others might be responding to.
- Describe any key content of slides, especially images, do not assume that these can be seen.
- Build in time for aurally summarising the key points of the session so far, ask others to contribute to this to ensure you have covered everything.
- You might consider giving the student permanent “open mic” so they can request clarification at any time.
Deaf or Hearing Impaired
Challenges
- How can the student tell what the presenter is saying? This could be the content of the session as well as the instructions on how to participate.
- Will the students have time to make sense of text dense information? If there are closed captions, information in the text chat area and text within a presentation it can be difficult to take this all in at once and keep pace with the session.
- For some students keeping up with the multiple information threads can be even more challenging as they are working in a second language, with their first being British Sign Language or another countries sign language.
Suggestions
- Check whether students are happy for others to know about their needs and how they prefer this to be explained to their fellow students.
- Depending on the content of the session, a presenter could work from a script which is sent to the students before the session. If they deviate from the script then this can be flagged in the chat by the facilitator.
- For activities, during the session, consider adding the instructions to the text chat or on an activity slide (remember this can be challenging for slow readers).
- Before the session provide students with knowledge of the terminology used during the session, as this can help with reading.
- Ensure the images you use support the text on the slide and are not distracting.
- Build in time for summarising, in the text chat, the key points of the session so far, ask others to contribute to this to ensure you have covered everything.
- If you are utilising a sign language interpreter pause regularly to ensure they are given enough time to translate what you have said. Also, check they can be seen by the student. Sometimes the settings mean they can only see the active speaker.
- It may be possible to transmit a video of yourself talking so students can lip read. However, this can be made more difficult if the connection speed is slow and the video ends up being jumpy.
Specific Learning Difficulty
Challenges
- Will the students have time to make sense of text dense information? Trying to take in information in the text chat area and text within a presentation can be difficult all at once.
- Will students be reluctant to participate in the text chat area because they fear poor spelling and typing speed?
Suggestions
- Check whether students are happy for others to know about their needs and how they prefer this to be explained to their fellow students.
- Reassure students that it is the value of the contribution over correct typing or spelling which is important.
- Depending on the content of the session, a presenter could send text dense information out to the students before the session.
- Ensure the images you use support the text on the slide and are not distracting.
- Build in time for aurally summarising the key points of the session so far, ask others to contribute to this to ensure you have covered everything.
- Give the option for students to use the open mic for questions or comments, they may feel more confident using this than the text chat.
- Consider using an easy to read font and text size to make this easier to access for students.
Physical Impairment
Challenges
- Will the student be able to fully participate if they only have keyboard access to all functions?
- How will the students cope with the speed of writing needed to contribute and the need to navigate between different tools to contribute to multiple threads?
Suggestions
- Check whether students are happy for others to know about their needs and how they prefer this to be explained to their fellow students.
- Depending on the content of the session, a presenter could send any resources to the student before the session so they can prepare for what they might want to say.
- Build in time for aurally summarising the key points of the session so far, ask others to contribute to this to ensure you have covered everything (navigation may be trickier without a mouse).
- Give the option for students to use the open mic for questions or comments, they may feel more confident using this than the text chat.
Key Points
There are a number of key points to take away from the information in this guide.
Communication
Promote an open dialogue with your students about their needs. The more open they are about their requirements, the more you can ensure that any adjustments you make are supportive of their needs rather than introducing additional barriers. They may already know what works for them, so you will not have to try lots of different things to find the right approach.
Preparation
As with most things preparation is the key. Make sure that you have considered the needs of your students well in advance of the session and make the resources you are planning to use available to them in advance. Preparation may also be needed for your students, do not assume they are confident in using this technology, they may not have come across it before and will need time to work out how their personal devices will interact with it.
Follow Up Resources
Make sure you follow up the session by sending out any resources linked to the session e.g. transcripts, recordings, resources and links. To continue promoting an open dialogue with your students, provide them with an opportunity to provide feedback about the session and encourage them to let you know whether they experienced any problems accessing the content or the activities.
Accommodations Help All
Remember that many of the suggestions made here can help all students and if the accommodation is detrimental to others then it is the wrong one.