
What are groups?
You can allocate students within your Blackboard (Course Resources) module into Groups. A Group area for each Group is created for students to collaborate with a number of tools made available within the area to assist Group work. The Group area can be used to aid students to plan, organise, exchange ideas, share resources and Group assignments can be set for students to work on together.
You can choose which tools are available to students. The tools available to choose from are: Collaboration, File Exchange, Group Blog, Group Discussion Board, Group Journal, Group Tasks, Group Wiki, Send Email and Group Assignment.
There are a number of ways to create Groups within Blackboard including random enrol, self-enrol and manual enrol.
Why would I use groups with my students?
- Provides tools to aid a more structured, task orientated approach to group work. This can be particularly beneficial to students who are not used to group work.
- Enhances the planning and organisation skills of the group, with the tools for collaborative working available at any time and place. Therefore reducing any obstacles relating to group members not being available to meet up at the same time or place.
- Develop students’ digital communication skills. Requiring them to communicate and collaborate in a professional manner within an online environment.
- Contributions made by each member during the process of group work are recorded. These are visible to both the Module Leader and students supporting the evaluation of how well the group worked together and the individual contributions made by each member.
- Supports differentiation in formative assessment, with the ability to set different tasks and provide different resources within each separate group area.
How do I use groups with my students?
- There are different ways in creating groups within Blackboard. Groups can be created as single groups or in group sets.
- There are also different methods in allocating students to groups, these are:
- Manual enrol: Each student in the Blackboard module is assigned to a group. This method can be used within both single sets or group sets.
- Random enrol: Is only available for group sets. Random enrol automatically distributes students to groups based on the number of students and the number of groups required.
- Self- enrol: Is available for both single groups and group sets. Students can sign themselves up to groups using a ‘sign in’ sheet.
Please note:
- Group tools are only available to you and each groups of students’ with the exception of group blogs and wikis, which appear to all module members when the tools are accessed in the module tools page.
- You can delete groups you no longer need. If you need to keep the marks in the Grade Centre you’ll need to tick to confirm that you want to keep the grades, for instance a graded blog or wiki. However, the content of what was created will be deleted when the group is deleted.
To Create a Group
You can create formal groups of students to collaborate on work, and create these groups one at a time or in sets. You can manually select group members or allow students to self-enroll. Each group has its homepage with links to tools to help students collaborate. Only you and group members can access the group tools.
There are two group creation options:
- Create a single group
- Create a group set
About Group Enrolment Methods
Manual Enroll allows you to assign each student in your course to a group. Manual enrollment is available for both single groups and group sets.
Random Enroll is available for group sets only. It automatically distributes membership into groups based on a designated number of students per group or the designated number of groups. Random distribution applies only to students who are currently enrolled in your course. You can enroll additional students manually.
Self-Enroll allows students to add themselves to a group using a sign-up sheet. Self-enrollment is an option available for both single groups and group sets.
- Select “Users and Groups” under “Module Management” on the left hand side menu.
- The menu will expand to reveal options for Users and Groups. Select Groups
- Click on the “Create” button towards the top left hand side.
- For Single Group, click Self-Enroll or Manual Enroll.
- On the Create Group page, type a name and optional description. Make the group visible to students.
- Select the check boxes for the course tools you want to make available to the group.
- Click the Grade option and type Points possible for Blogs, Journals, and Wikis, if you want to grade student submissions.
- Unselect the check box for Allow Personalization.
- For self-enroll Sign-up Options, type a name and provide instructions. You might tell students that they cannot unenroll themselves from groups. Type the Maximum Number of Members. Select any other options you want to include.
- For the manual enroll Membership section, search for and select students from the Add Users pop-up window. Your selected group members appear in the bottom area with a number showing the total count. Click the Show List function, represented by a full square, to open the Add Users area to view your selections. To remove a user, click the X.
- Click Submit.
- The newly created group appears on the Groups listing page.
On the group homepage, students can access the tools you added for them. Only you and the group members can access tools enabled for a group, with the exception of the group blog and group wiki tools. Group blogs and wikis appear to all course members when the tools are accessed on the course Tools page.
The following list describes the available group tools:
Group Blog: Users within a group can add entries and comments to the group blog to share ideas. You can grade group blogs, but after you enable grading for a group blog, you cannot change that setting. When you add a grade for a group blog, the grade is automatically given to all the members of the group.
Collaboration Tools: Users within a group can create and attend real-time chat or virtual classroom sessions.
Group Discussion Board: Users within a group can communicate as a group, as well as create and manage their own forums. The group discussion board is available only to group members, not to the entire course. Unlike other graded group activities, when you set a group discussion board to graded, each member is graded independently of other group members.
Email: The group email tool allows for efficient communication. The recipient list is automatically populated with group members, so you can quickly select all or some of them. Emails are sent to members’ external email addresses.
File Exchange: You and group members can use this tool to upload documents to the group area, and delete files, regardless of who added them. Files appear in the order they were uploaded. Uploaded images appear in a new browser window. This tool is only available to groups.
Group Journal: Users within a group can share their thoughts with each other and communicate with you. Journal entries made in the group journal are visible to all group members and you. You can grade group journals, but after you enable grading for a group journal, you cannot change that setting. When you add a grade for a group journal, the grade is automatically given to all the members of the group.
Group Tasks: Users within a group can define and separate the workload into tasks, while distributing the list to the entire group. Each task has a status and a due date to help keep members on track. Group members can view the group assigned tasks in the group tasks tool or in the course tasks tool. You and other course members will not see tasks for groups they are not enrolled in when viewing the course tasks tool.
Group Wiki: Use group wikis to create a collaborative space for group members to view, contribute, and edit content. By default, all course members can read group wikis, but only members of the group can make a comment on their group wiki page. You can change the default setting to allow only group members to view a group wiki. You can grade group wikis, but after you enable grading for a group wiki, you cannot change that setting. When you add a grade for a group wiki, the grade is automatically given to all the members of the group.
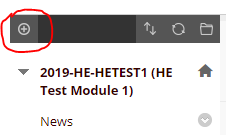
To add a groups tab in to the white menu you fist need to click on the + button above the menu
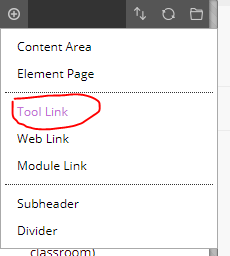
Then choose Tool Link
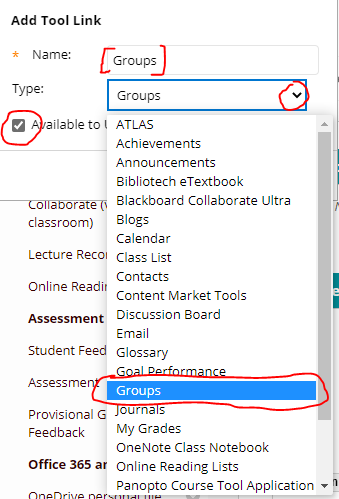
Type “Groups” in to the name box
Under Type choose Groups from the drop down list
Tick on The Available to Users radio button
The Groups tab will appears at the bottom of the white menu. you can drag it up the menu by hovering over it and draging to the arrows to left of the text
Your student will now have access to groups and the self enrolment form